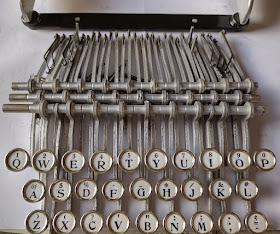
In preparation for mounting the keyboard 'tapestry' back into the frame, the linkages were sorted on length. They are not numbered, so were kept in sets of 14 for left and right sides of the machine to allow every linkage to be placed back in its original spot. (And of course all were cleaned and rubbed with a bit of vaseline.)
There may be a way, but it didn't seem possible to attach the outer linkages to the key-lever when inside the frame. To avoid that puzzle, deviated from the procedure shown at Words Are Winged and already attached the outermost 4 linkages for both left and right. Also the distance-bushes were added, of course.
This whole assembly was then wiggled back into the machine from the front. The three rods fixed with the screws through the frame-sides. Some painters masking-tape on the front bar to prevent scratching of the paint during the process.
The next step was mount the typebars - these were also laid out in the correct order just like the linkages. A little cloth with oil to give every screw a little dab and tweezers to manoeuvre the linkages back into place.
The typebar-rest on the Standard Folding is mounted onto the front-panel and is what determines the height of all the keys. This front panel unfortunately lost its original dull, passivated finish during the paint-stripping. To get rid of the shiny aluminum and make it suitably 'dull', the panel was glass-bead-blasted -very carefully.
The above image shows the left-half already blasted, the right-end still shiny. The blasting was done carefully; only very low air-pressure and especially a very constrained supply of blasting-material. With aluminum there is a very real risk of creating such surface-stress that the part will warp and deform. First practiced on a scrap test-piece. Fortunately, the panel survived unscathed and is now nicely even and dull/matte.
The rod for the springs was bent ever so slightly - either from a 'bang' or from a century's worth of the springs pulling it (although metal should not relax that way). The rod could be rotated a bit to now be pulled straight - all the springs will stop it from turning, so no need to 'fasten it tight' with the screw-thread.
The original typebar-rest felt was kept, merely given a gentle lukewarm wool-wash and turned over. It is clamped between panel and its support bracket at both ends (and some glue-stick glue on the bracket).
The base of the Standard Folding typewriter is now mostly complete; of course all adjustments remain to be done after the whole machine is fully assembled. (A bit daunting; the segment of a Corona 3 is already a bit tricky; this is 28 separate segments to tackle :-)


No comments:
Post a Comment