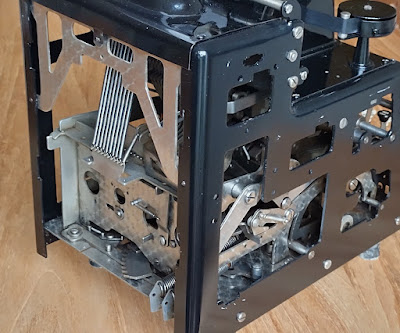
The 'surplus' machine is mostly assembled again - and the side-frames are back, painted black.
As the machine shows promise of turning out nice, decided to have another try at repairing the damper or dashpot. Especially because the manual even instructs to pull the lever forward and then let go. With an empty dashpot, the lever slams back - not nice and not great for the mechanism.
With the machine already mostly assembled, it was still possible to take out the damper. The sideframes can be left, but the top-cover and printing-mechanism and spool-plate are best taken off. Then remove the screwed pivot-rod that holds the top of the damper and at the bottom first loosen the lock-nut (fiddly) and then remove the screw. The damper can then be manoeuvred out of the mechanism. After another failed attempt with heat to unscrew the tubes, went the radical approach and drilled a hole in the side of the upper-tube of the damper. That spot should be still above the piston at the extreme extended-position, so relatively 'safe'.
After filling the dashpot with sewing machine oil, a light 'paraffin oil', it started to work quite well as a damper! The hole is above the oil-level too, so not critical. It was threaded and closed-off with a screw and washer+gasket. (Threaded with 5/32" Whitworth because that was the tap-set I had handy -and a new, brass Meccano 37b is the plug :-)
When again fitted in the machine with the top-cover in place, this filling-plug is not visible. Most importantly; it is now safe to let go of the lever after the forward pull, as per instructions. The lever will move back swiftly, but without the hard slamming.
Even though this 'wreck' Dalton appeared to be fully working, there are several small malfunctions only discovered during the refurbishing. Like e.g. the peg-board carriage making a half-movement at the 8th digit, or the non-print button failing to re-set after a stroke of the handle.
The non-print button can be pressed down with the thumb when starting to pull the lever (very ergonomic, well-designed!). When pressed-down it is latched in the down-position and should pop-up again after one stroke of the handle.
This is achieved by the tip of a conical 'stud' that pushes the lever off the 'latching-notch'. Maybe this mechanism got deformed (this machine got knocked-about at some moment during its ~100 years), or worn down, but it didn't push the lever back enough. A few layers of copper-tape were wrapped about the tip, to give it an extra .3 mm or so.
With this little fix, the non-print is again pushed forward just enough to pop back up at the end of a stroke.
An obvious 'fail' that was also remedied, was a flat feed-roller. The front feed-roller of a Dalton is pretty small and after 90+ years the rubber will invariably be flat. The larger-diameter rear-roller was fairly round still, left as it was.
The front-roller was stripped to the metal core and given a few layers of heat-shrink tubing, per usual method. Re-assembling the 'carriage' is surprisingly tricky; the factory must've had a handy jig. After several tries it came together and now line-feeds as intended.
Overall, this new (in 1921) Super Model range is pretty impressive. It has a reassuring amount of interlocks and even this most-basic version looks fancy with that "Damaskeen finish", as Dalton called it.
Progressing to a refurbished, fully functioning Dalton :-)


I can't even begin to imagine disassembling and reassembling one of these things. I'm impressed.
ReplyDelete