Sunday, February 27, 2022

Charles Boogie

Thrift stores are open again - on a treasure hunt with all the kids. There's something to see for everyone. Among the yards of bins with vinyl, one solitary shellac disk was lying on a bottom shelf - no sleeve, but still good. A lucky find :) 

The man behind the counter didn't want anything for it, waving me through - please take it. Still, that doesn't quite feel right, so paid 50 cents for the record to 'own' it. With a nice bright label, Sonora Swing! Charles Boogie, performed by Charles Norman accompanied by Seymour's Orkester. 

Released in April 1941; orchestra's were still swinging in Stockholm.


Just played. Definitely boogie woogie - happy find! :-)

Saturday, February 19, 2022

Thoroughly cleaning an Erika M typewriter's segment

To give the slots in the segment and the typebars themselves a thorough cleaning, the segment was removed from the machine. There was only so much that could be cleaned when still in the machine, the slots were fairly gummed-up.

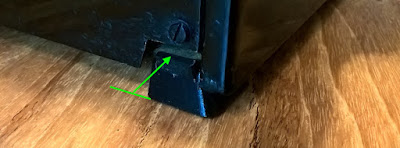
Very unlike the tricky carriage assembly, taking out the segment of an Erika M typewriter is surprisingly straightforward. The segment block and also the type-guide are doweled, so they can be taken off and re-mounted without losing their adjustment. After removing the mounting screws the parts can be pried off, taking care with the dowel-pins. At both ends of the segment-block, a screw with a little plate holds the pivot-rod in place. 


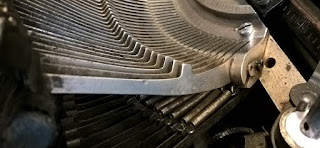
By the way; on the outer typebar can be seen some 'dimples' - this is likely where the typebar was peened for some final adjusting after soldering in new type-slugs. This was probably done as the machine was customised with added Æ and Å characters when purchased new.

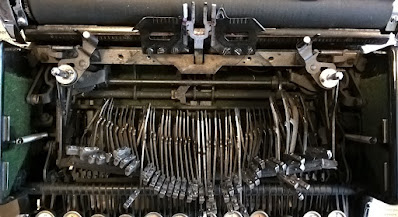
Removing these little plates allows the pivot-rod to be pushed out. The typebars then can be slid out of their (gummy) slots. The segment-block is then completely free to be taken off for a proper cleaning. The typewriter does look a little dejected then...


The typebars cannot easily be taken off the machine, because the linkages have been riveted. A benefit of this is that the typebars cannot get out of order - the typebars are not numbered. (The number '1' that can be seen on the right-most Å typebar seems to indicate the type of bend it has, there are three '1' typebars, then three '2', followed by all '3' bars to the centre of the basket.)

The segment-block was thoroughly cleaned with white spirit (petrol sans additives) and polished-up. Working a rag and then cardboard strips through the slots helped to remove all the hardened dirt. The typebars were also polished-up (Brasso) with stubborn dirt first scraped off (wooden skewer). After this, both the segment and the typebars are smooth and clean again.

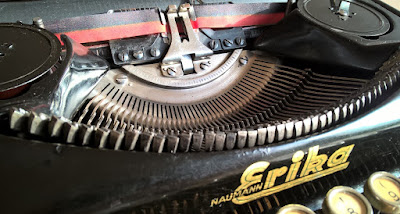
Then the segment can be re-fitted. Simply start inserting the typebars at one end and passing the pivot-rod through one typebar at a time. When they're all in, then the segment can be pushed onto its mounting-bar and fastened.


Clean, smooth typing-action again :-)

Tuesday, February 15, 2022

An M's not Made for Maintenance

The Erika M typewriter is a magnificent writing machine, but it may not be the most maintenance-friendly machine. To give it a proper cleaning and to get at the feed-rollers of this 'barn-find' project machine, some disassembly was attempted. Removing the platen seemed a logical, basic step.

  • To remove the platen-rod, the bracket around the paper-release lever has to be removed.
  • To remove the bracket around the paper-release lever, the carriage side-plate has to be removed.
  • To remove the carriage side-plate, the platen-rod has to be removed. (See point 1.)

Turns out that by loosening the side-plate screws (to give it a smidgeon of play) and a bit of luck with wiggling the bracket, it can just about be manipulated out between the platen and the side-plate. Only then are the set-screws that hold the platen-rod revealed. Loosening these then allows the platen-rod (and knob) to be pulled out and then the side-plate simply screws off. (Oh, first take off the tabs-clearing lever of course).

Lots of felt and lots of dirt to be cleaned away.

This is a proper puzzle, this is.

(Still haven't figured out how the paper-guide can be removed from the paper-tray...)

Thursday, February 10, 2022

Cushioned feet for the Underwood portable typewriter

The feet of the Underwood Champion portable still needed replacement. These Underwoods of the Typemaster range of the late 1930s have a slightly more complicated feet-arrangement than most machines, but replacements can be manufactured with 3D printing and basic materials.


The newly printed parts include rear-feet with a fold-up flap for buffering against the rear case-clamps (right-most). Then two rubber bushes for the front mounting-screws of the housing and left of them the front feet. The front feet are made of two parts, one rubber 'foot' and a hard-plastic flanged-bush to fixate them. Additional basic material is self-adhesive felt-pad (for furniture) and a tube of simple textile glue, i.e. latex. (The 3D models of the various printed parts are downloadable here in a zip-file archive.)


The rubber feet of themselves are somewhat dampening. To make 'cusioned feet' to further improve the noise-reduction, a layer of felt is added. The feet-base has a recess that takes a felt-pad cut to size. To give the felt grip, these are then given a thin layer of the textile glue. Of itself this does not adhere very well to the felt, but when 'tamped down' it will entangle in the felt and stay put. This gives the felt excellent grip when the weight of the typewriter is on them. 


This Champion still had front feet, however these fell apart when trying to wrest them off the machine. The front feet of the Typemaster machines have a flange that was originally pushed through a hole in a tab of the machine frame. When the rubber was new and soft, that would have worked, today the rubber is fragile and the flange just comes off. 

The new front feet are made of two parts; the hard-plastic bush is put through the tab from above, the rubber foot is then a press-fit on the bush. This hard-plastic bush is hollow, because this has to fit over a prong in the carrying case. Two tabs protruding from the inside-rim of the shell keep the feet from rotating.

The front screw for mounting the housing-shell looks like a regular foot-mounting bolt, but it isn't. It should hold a rubber block between the shell and the frame for extra sound-dampening. This rubber was long gone, now replaced with a rubber bush.

The rear feet are more conventional, these screw on as is expected for pre-war typewriters. First glue the flap into place, folded over in the slot in the top. The raised-lip should naturally be at the rear of the machine, otherwise it won't fit. These prints should have been about a mm longer towards the rear - the flap now is bent outward, but it'll have to do.


This raised rubber flange provides a buffer between the machine frame and the bracket that holds it in the carrying case. A lip of this bracket slides into the machine, just above the rear feet.

The original rear feet were, by the way, no longer really fully present - these had gone 'liquid' and then partly congealed on the rear clamps in the carrying case.


These remnants were chiseled away and with the newly manufactured feet the typewriter now again fits in the case.


The rubber dampens, the felt gives additional cushioning. The embedded textile-glue gives enough grip for the typewriter to stay put when used. This typewriter is on its feet again :)


With these new feet, the refurbishing of this 1939 Underwood Champion is mostly finished. It is clean and usable, but to be fair it is 'worn out'. Apart from the scuffs and scratches of the outside, the inside mechanism is very worn and rather roughly 'patched-up' - so although it is again usable, it probably is not a good representation of what these Underwood Typemaster portables would/could/should be like as a writing machine.


But this 1939 Champion still looks really stylish - swing era!

Tuesday, February 1, 2022

Various small fixes completing the Erika folding typewriter

The little Erika folding typewriter had yet a few extra quirks to be fixed.

Universal bar biasing spring
The universal bar (of the machine-base) has to be in the forward position to mesh correctly with the carriage when unfolding the typewriter. The ribbon vibrator tab (cyan arrow) and the escapement tab (orange arrow) must be caught the right-side, otherwise the carriage blocks and brackets get bent. This machine sometimes did block, mangling the vibrator-bracket. 


To make sure the bar will mesh correctly, a small felt-pad was placed behind the springs that bias it forward. These springs are mounted inside the machine back-plate. 


The felt-pad position can be tweaked to find the lowest added spring-force for reliable meshing. Because this spring is worked against with every keystroke, a lowest possible force is best.

Spacebar travel-limit buffers
A threaded rod on the spacebar holds buffers, moving against a forked tab on the frame. The upper buffer was still present, but it had been squished into the hollow of the metal spacebar. The century-old leather was given an infusion of leather-wax and two felt-pads for extra support.


The lower buffer probably perished decades ago and only two nuts remained on the threaded rod. A new buffer was made by a ring of felt glued to an M3 washer. The upper nut thus falls neatly inside the felt ring and makes the tab rest against the felt as the washer is clamped by the two nuts.

Re-nickeling rusted parts
This folding Erika must have lost its protective cover long ago - if it ever had one. The exposed bell had been damaged and rusted quite badly. Also the spring-drum screw was rather rusty. Even with this rust removed, the bare iron was jarring.


Basic kitchen-table nickel-plating works fine on brass, but not so well on plain steel. To prepare the parts for nickeling, they were first thoroughly cleaned with steel-wool and lightly sanded (random pattern) with fine sandpaper. This gives a smooth surface with lots of little scratches. To help with plating bare iron (or mild steel), the surface was then firmly rubbed with copper tape. Using thin tape allows the soft copper to be firmly rubbed onto the shaped surface and into any small scratches. The parts then have a vague reddish sheen, confirming that copper is indeed lodged in the surface. 

The 'coppered' parts were then nickel-plated with the kitchen-table method. Where brass is done after about a minute, these were left in the electrolyte for over 10 minutes. Afterwards thoroughly washed and then polished-up.


The initial results look credible - especially the screw came out very well. The bell is clearly still pitted, but now again nickeled all-over. It will remain to be seen how long-lasting this fix will be of course, but for now this was a successful experiment :)

Wide ribbon
The typewriter had a regular 13 mm (half inch) ribbon when purchased. These Erika machines however need a 16 mm ribbon. (The narrow ribbon probably was the reason that vibrator-linkages had been bent out of shape a bit, would've been needed to make the too-narrow ribbon work on the machine.)

Whilst new 16 mm inked ribbon can be found, making one from scratch was tried with a length of 15 mm 'satin' ribbon from a local haberdashery store and stamp-pad ink. (According to the MSDS this ink is basically glycerol with colorants.)


Inked by pulling/rubbing the ribbon over an inked pad, building up slowly with test-typing between applications (easier to add ink than to take it away again).


The net-result is not-great, compared to the reference black typing. The ink itself is probably too diluted and not ideal, but also the ribbon is likely too stiff. Nevertheless the machine does type with a wide ribbon and it's legible - functional and ready for use.


New nut!
As a last little fix, that missing nut of the backspace-crank was replaced with a shiny new hex-nut. This time the carriage mechanism still works even! It now only jams-up the backspace key - very occasionally... :) 


The backspace draw-bar may need some more tweaking, but for now pressing the backspace-key with care will do.

Facit
The little Erika folding typewriter is a great tinkering-object, an enjoyable "3D puzzle" to solve. To be honest however, as a typewriter it has not yet impressed. The build-quality is excellent, but the typing feel is cumbersome and the machine feels slow. Almost an opposite to the later Erika M's velvet touch and astonishing print-quality. 


It does look very '1910' and it is great fun though :-)