Sunday, December 24, 2023

Progress on the Corona 3, emptying of the little bags

Most of the parts in the plastic bags have been cleaned, so re-assembly can start. The Corona 3 folding typewriter is a reasonably straightforward machine with relatively few parts. Its construction is however a bit different from most other portable typewriters. It is however similar to most others typewriters in that it has a couple of little 'tricks'. The type of thing you'll know how to do the second time round.

One such trick was that the connecting bar at the lower-rear is not symmetrical. That's the round bar that holds the shift-adjustment screws. It only differs by a mm, but it has a left and a right end.


Taking it out again is a bit of a hassle, but not too inconvenient.

The keyboard is different from most typewriters, in that the key-levers form a sort of 3-row crochet pattern. The 28 key-levers all have an integrated 2-hole bracket that will hold them upright on their pivot-rod.

They keys all are clearly marked where they have to go (of course), so easiest is to set them out in the correct order - for then sliding in of the rods.

When the rods are fitted through all the key-levers and spacers etc again fitted, then the whole assemblage can be inserted into the frame from the front. 

First however; also add the space-bar linkage to this assemblage! The spacebar linkage cannot be inserted into the machine after the keys-levers are fitted (and the main carriage pivot-rod is already in-place).

When the keyboard is mounted the second time (now with the spacebar), the segment can be clamped to the back-wall with the type-bar-rest brackets. 

This is another quirk of the Corona; the segment is not pinned to the frame, but clamped by the brackets. It has a lot of leeway on how it is positioned in the frame, and no easy adjustment screws; loosen the bracket-screws and it all drops down again. (Adjusting will be interesting.)

For fitting the type-bars, the type-bar-rest had to be removed again. Even with the rest removed, it is 'fiddly'.

The type-bars could perhaps be fitted in the segment before mounting that in the machine. Or perhaps even onto the rod that then goes into the segment from the front (it is a slot, not a 'channel'). But then hooking-in of the connecting rods would be impossible to do. 

That the universal-bar bracket has a special cut-out to allow the pivot-rod to pass through as it is fed into the segment is probably a hint that it actually was meant to be assembled this way.

So; progress and already many bags empty :)

Friday, December 15, 2023

There'll have been someone before

When working on a decades or century old typewriter, chances are that this is not the first time the machine has been worked on. Quite often the tell-tale signs are marked (mawled) screws or scratches inside the mechanism. 

Or as here, clear signs of the wooden spacebar having been re-fitted with new holes some time in the past. Just like the traces of black paint daubed over parts of the mechanism; signs of earlier fixing and sprucing-up.

This Corona 3 folding typewriter has now been completely taken apart. Despite the signs of older work on it, fairly certain this is the first time since 1919 that the frame has been quite this empty.

Hadn't seen a Corona 3 this way before; the serial number is actually in an obvious, logical spot - easily readable too :)

Tuesday, December 12, 2023

With the register showing 37,639,572,042

The 1920 printing of "Applied Mechanical Arithmetic as practiced on the Comptometer" of course also shows the new controlled-key models with improved clearing mechanism. For example, this 10-column standard configuration model H:

In the photograph, the machine's register is set to display 37,639,572,042 - seems to be a random range of numbers.

To check - also when seen entered into an actual 10-column Model H, the numbers seem random. 

Most likely 37,639,572,042 is merely to show that the register can contain digits, with no obvious link to any of the many calculations in the book - but still wondering if there's an Easter Egg hidden in there somewhere. (That I'm not yet seeing - anyone?) 

Saturday, December 9, 2023

Not made by Felt & Tarrant, then not a Comptometer

In 1920 the company behind the Comptometer published an updated edition of their 1914 book "Applied Mechanical Arithmetic as practiced on the Comptometer". This ~600 page book was intended to help sales of the Comptometer to businesses. After a general description of the basic operations of the machine, it gives detailed examples of business calculations and how the Comptometer could make the work-flow more efficient in various industries. With extensive examples of companies' business forms and data shown, it gives a perhaps-unique peek into business information-technology of the early 20th century.

Comptometer sales-numbers by the 1910s had started to pick up, from a very slow start in the late 1880s, but in 1911/1912 the Burroughs company launched a near-identical competitor product. Hence F&T's insistence that they are the only 'real' Comptometer (that risked becoming a generic name for a key-driven calculator). The line "If it's not made by Felt & Tarrant, it's not a Comptometer" is in the footer of every page.

There are several pictures in the book that show Comptometers as used in various offices. (And also some clearly staged scenes to illustrate a workflow.) For example; a page in the section on wholesalers:

A picture is included showing a wholesale office using Comptometers:

But there's something unexpected in this picture. Quite visibly in the front of the view are two of the competition Burroughs copycat machines.

Must've slipped through, probably simply not spotted. Those Burroughs machines were the reason for that line at the foot of every page. Felt & Tarrant also filed a patent lawsuit against Burroughs about this machine - forcing Burroughs to withdraw it from the market. (Burroughs however re-designed and introduced a new, smaller machine and stayed in the key-driven calculator market.)

In their operation and in how they are used in the information-workflow of an office the Burroughs Calculator and the Comptometer are identical. However, as the footer drives home on every page: they're not made by Felt & Tarrant, so they are not Comptometers.

Sunday, December 3, 2023

Typewriter cleaning-project approach - lots of little bags with little projects

Just started, the cleaning of a Corona 3 folding typewriter.

With a very simple machine, such as e.g. that little pencil-sharpener, all is taken apart and laid out for cleaning. A typewriter however is a large job with several-hundred parts, even for a little folding portable this is intimidating. Daren't attempt that. Also, the projects are mostly done at the kitchen-table so it is important to be able to put everything away.

The solution settled on is lots of little plastic bags. As panels are taken off, they are bagged, the screws are put in a small bag - this bag kept with the panel in a larger bag. As 'units' or sub-assemblies are taken off the machine, they all get put in their own bags with all the screws. When in doubt (e.g. left-right mirrored assemblies) a note is added to the bag describing what the parts are. (And photos are taken before taking off a unit, these pictures are often needed later. :)

This Corona 3 folding typewriter I've had for about a year now. It was very dirty, a little rusty and mostly complete. Small spots of sewing-machine oil were placed on all visible screws before putting it away, so all screws now should come out with relatively little trouble. Ready to be cleaned/restored and get it typing properly again.

When most of the parts on a 'module' are accessible, these are taken off and cleaned one-by-one. E.g. here the carriage base parts are taken off one 'unit' at a time, cleaned and then put back. Small trays are useful to keep screws and whatnots with the sub-assembly.

This way, the amount of scattered parts at a time is limited. This also makes it possible to do a relaxed, slow typewriter cleaning/restoration project as a series of small projects. This method e.g. was also used in the recent full taking-apart down to its baseplate of the Oliver 3 (and its subsequent rebuilding).

The little Corona will be a relaxed, slow cleaning project - or rather; a series of small projects for an evening or afternoon of relaxing tinkering.

Friday, December 1, 2023

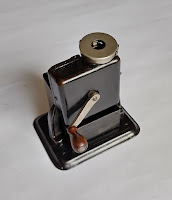
Avanti - these are fun contraptions

Several hundred-thousands were made of these, but they are somehow rather thin on the ground. Did manage to snag one last week though - with 'patina', but complete and with intact decal.

There -of course- is information about pencil sharpeners on the hive-mind that is the Internet. There is information about the maker of these Avanti devices, the firm of Emil Grantzow in Dresden as well as on the machines and how they evolved over time. Mr Grantzow started patenting and making these little machines from around 1908. From the decal and its features, this specimen can be dated as having been made between 1923 and 1938. 

The remnants of gold pin-striping makes me think this one was made in the 1920s rather than the 30s

To clean the device, it was taken apart as much a possible.

The decal on these machines is by the way not applied direct to the little bin, but is on a separately applied nameplate. The brass knob holds it in place.

All individual parts were cleaned. Hot, soapy water for the greasy parts; scrubbing with stiff brush and steel-wool where needed. A polish for the nickel. A gentle rinse for the lacquered parts in warm water. Then new oil, grease and wax was applied to all parts.

Putting it back together, the pencil clamping-ring is a surprisingly nifty assembly with unexpected split baseplate. That baseplate needs some adjustment to get the friction right, for proper clamping of the pencil. Other than that, it is fairly straightforward. The reduction gear-train is on a plate that can be adjusted to fit properly right-below the pencil clamping assembly.

And all together again; a shiny clean pencil sharpening machine.

Then the question is; does it work?

Yes, it does :-)

The knives are certainly not as sharp as they would have been originally, but it does actually work. It does prefer hexagonal pencils, round ones can slip in the clamps. Very neat is that the lever at the side allows choosing how sharp the point will be; from a robust, blunt to a fine, sharp point for drawing. Also a feature is that when the pencil is sharp, the machine will simply stop sharpening - no 'chewing-up' of a pencil if you just keep turning (and the temptation is there, fun machine).

Every (home-)office should want one! -these really are fun contraptions :-)