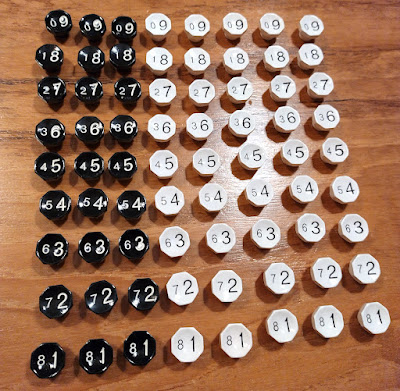
The project Comptometer model H got 'new' keys at its refurbishment in (probably) the 1940-ies, however these cream/green keys of a model J don't age well. Also, the keys of a model H Comptometer should be black/white instead of green/cream. These are one-piece moulded 'plastic' keys, similar to the keys of e.g. an early Oliver typewriter. As part of this model H's current 2023 refurbishment, decided to go for a full set of new keys in black and white. Replacing all keys makes it actually a lot easier, because blending in with any original keys won't be a problem.
In a 3D CAD-program (mesh-editor) new keys were designed, dimensions taken from the least-degraded remaining keys.
The dimpling was of course varied for the even and odd keys, as well as the practical depth of the lettering was worked out with some test-prints.
Also from some (failed) test-prints, worked out a way to make the pockets for the key-stem a bit flexible to get a workable press-fit on the stems. The open areas around the stem-pocket could later be filled after fitting on a stem (e.g. with glue), in case the extra strength should be needed.


Excellent work! Really points out the usefulness of 3d printing
ReplyDeleteWas it hard to remove the old caps? I have understood that you need to break them to get them off.
ReplyDeleteAnd do the new caps feel good and sturdy?
I bought myself a Comptometer model L, and while the green key caps are in good condition, the white ones are flaking apart. I might need to replace them at some point.
Removing the old keys was actually surprisingly easy - see my Aug 12th post. The leystems do need to be taken off the machine though.
DeleteThe base of the new keys should've been made a bit thicker - they are a wee bit fragile (but are holding up). Resin is more brittle than the MJF-nylon they were originally designed for. So, probably good-enough, but could be sturdier.
The white keys are the problem indeed - they are of cellulose-acetate and don't have enough white pigment to act as antacid - so degrade and leech vinegar.
Good luck with your Comptometer! (a J?)
very nice work!, trying to replicate it, i already have the keys printed (i made the base thicker as you suggested), now trying to paint the letters... how did you put the paint inside the very small letters. thanks a bunch for sharing all your work
ReplyDeleteThat's great! The latex wall-paint is just smudged into the lettering, not worrying about getting too much all over the key. After it has dried, the excess can be wiped off with a damp cloth held tight and flat. (Have actually been improving the key design, making more - i need to write a post and upload improved files! :)
Deletegooood, i will follow your suggestion with the paint.
Deletejut fyi, my thicker keys are here: https://drive.google.com/drive/folders/1seP41Alr0cBNJ9dGKihkTFqT0gVWKIVH?usp=sharing
looking forward to your next post
you are saving me a ton of time!!! I really appreciate it
Your project was the nudge to finish a post about re-keying a model J - just posted. Also an extra picture of how the lettering is done. Hope it can help!
DeleteGood luck with your Comptometer restoring - they are great machines :-)