And it all came unhinged :)
Well, not quite that bad, but there were a few parts that could have been left on. The two screws at the back of the carriage hold the bracket of the paper release lever. Removing those screws yields the paper release lever and rod.
Didn't have to come off, but will be able to give it a good clean now.
Having looked at the way it seems to be put together, started off by trying to loosen the carriage bearings to see if that would allow it to come off. The rear bearing rail is held by the four screws circled in the picture. Just loosening these a turn, the carriage bearing can be adjusted. These were very solid, took oil and a few taps with a small hammer to loosen them.
This does give the carriage play, but does not allow it to come off. If the carriage goes sluggish or blocks somewhere along its travel, adjusting such a rail may help. Maybe not necessary to loosen this when sliding off the carriage, but will make it easier to slide off and on again.
Spending some more time to look at where the carriage is held revealed a painfully obvious stop-screw in plain sight. On both ends of the carriage base that is fixed to the machine there is a small stop-screw. These screws stop a small stud in the centre bottom of the moving carriage base.
A bit embarrassed, removed that screw and the carriage slides off easily revealing the two sets of bearings. The front and rear bearings are held nicely in a cage with a sprocket that ensures they stay in situ.
With the carriage off, it becomes more practical to finally get at the feed rollers. Looking more closely again at the paper-tray, this is impossible to remove by unscrewing the brackets. The paper tray is right on top of the screws that hold the brackets to the carriage base. As far as I can tell the only way this can have been assembled is by holding it all down in a jig and then insert the rod in the hinge. (Moments to wish a typewriter repair shop was nearby. Or even not-nearby for that matter :-)
Oh, the two screws underneath the centre of the carriage base hold a small cast block that holds the spring wires that provide the clamping force for the feed rollers. (These also did not have to be loosened... Oh well, discoveries.)
With better access, it is however possible to carefully bend open a little the folded lips that hold the feed roller axles. With the eyelet lips bent open just a bit it becomes possible to use pliers to pull out the rods and get at the rollers.
To keep them in, one end of the rods is knurled. This knurled end is press-fitted into its lip during assembly to keep it in place firm. The front feed-roller rods were applied from the outsides, so can be pulled outward. The rear feed-roller rods (in the bogies) are identical sub assemblies that were probably fitted to the carriage already assembled. So the left rear rod should have been pulled to the right and not left through the rollers...
Got them all out now to be made round again. Most rusted parts of the carriage are now also accessible to give them a good clean and shine.
Progress :-)
Friday, September 19, 2014
Wednesday, September 17, 2014
Disassembly
Have started on the Remington Portable 2 - first step of taking it apart. Well, at least as far apart as is necessary to replace the feed rollers, touch-up the housing shells, replace felt, deep clean etc. Putting a rubber tube on the platen would also be good.
Taking off the shells was fairly straightforward (taking pictures every step of the way, bagging every screw and part).
How to get at the feed rollers has me stumped for now though. Removing the paper table should ideally be possible without taking the carriage off the rails. As far as I can see the paper table assembly is screwed to the carriage base with a screw that is underneath the paper table itself.
It was the putting together again that I was initially worried about, but just taking it apart is puzzling already :-)
Any hints or suggestions most welcome. It's an intriguing puzzle...
Taking off the shells was fairly straightforward (taking pictures every step of the way, bagging every screw and part).
How to get at the feed rollers has me stumped for now though. Removing the paper table should ideally be possible without taking the carriage off the rails. As far as I can see the paper table assembly is screwed to the carriage base with a screw that is underneath the paper table itself.
It was the putting together again that I was initially worried about, but just taking it apart is puzzling already :-)
Any hints or suggestions most welcome. It's an intriguing puzzle...
Wednesday, September 10, 2014
Graphoplex No 612
Prompted by the posting about a book on sliderules over at Munk.org, made a scan of the leaflet that came with a pocket sliderule I got recently.
It is a regular 'Rietz', but rather small with a 12.5 cm scale. This one looks and feels absolutely new and unused, the leather sleeve is pristine as well. The only marking on the back indicates it was intended for Heemaf, either for use by the company or perhaps more likely meant as a promotional gift. The overall look and feel makes me guess this could be as recent as the seventies, but hard to tell really.
In the small leather sleeve with the small sliderule comes one sheet of instructions folded up equally small. A very condensed course in using this system 'Rietz' sliderule (in Dutch).
It is a regular 'Rietz', but rather small with a 12.5 cm scale. This one looks and feels absolutely new and unused, the leather sleeve is pristine as well. The only marking on the back indicates it was intended for Heemaf, either for use by the company or perhaps more likely meant as a promotional gift. The overall look and feel makes me guess this could be as recent as the seventies, but hard to tell really.
In the small leather sleeve with the small sliderule comes one sheet of instructions folded up equally small. A very condensed course in using this system 'Rietz' sliderule (in Dutch).
Friday, September 5, 2014
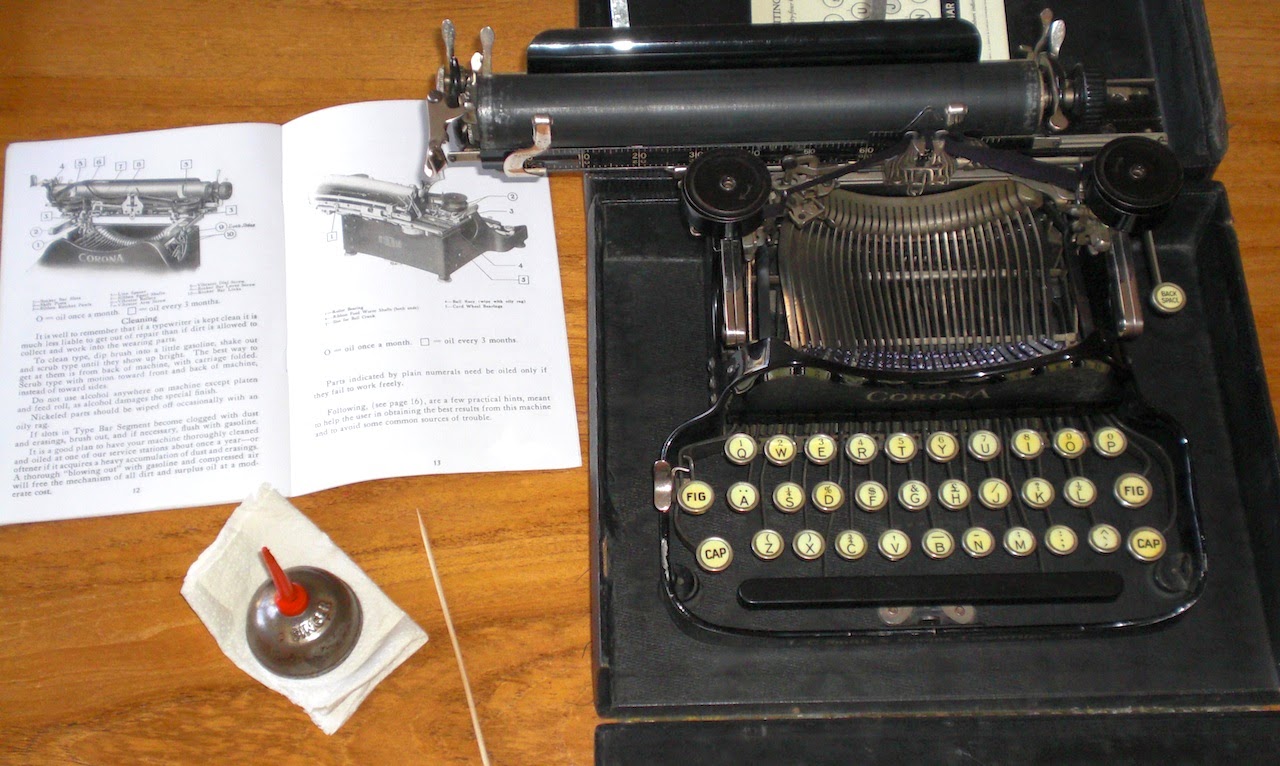
Corona care
Actually an easy and relaxing little task to do. Most time is taken by locating the part from the diagram on the machine itself. Did have a positive impact on the smoothness of the carriage.
(The manual for this model of the Corona 3 folding typewriter is online on the Archive.)
Monday, September 1, 2014
Relic
Spotted as a decoration piece in the lounge / dining-room of a hostel. The small flowers are plastic, lending it all a solemn yet sadly cheap air.
Despite the artificial floral surroundings, the machine still looks solid and reassuringly metal. Some faded keys had paper labels with the letter written on them by hand, suggesting some use when already worn and faded. Did not dare touch or tamper with it, but its current state with keys all a jumble suggests misuse rather than use. The paint looked a bit 'cloudy', as if it's been chemically attacked by something. Two metal Olivetti spools.
Relic.
Despite the artificial floral surroundings, the machine still looks solid and reassuringly metal. Some faded keys had paper labels with the letter written on them by hand, suggesting some use when already worn and faded. Did not dare touch or tamper with it, but its current state with keys all a jumble suggests misuse rather than use. The paint looked a bit 'cloudy', as if it's been chemically attacked by something. Two metal Olivetti spools.
Relic.
Wednesday, August 20, 2014
Tool of 1001 Uses
Quite widely advertised at the time, the versatile hobby-tool of its day, the Handee.
Haven't sent for the catalog, but somebody did do so a while back and it somehow ended up on my bookshelf. This is what the little catalog booklet looks like.
It's got a copyright date of 1940 inside the front cover (and 1938 on the backpage, weird), the first couple of pages extoll the virtues and many uses of this handy Handee tool.
And on the top of page 9, it is found as a useful tool in servicing office equipment; in this case taking a Handee to a typewriter.
Taking a Handee (or a 'Dremel') to a typewriter was not my first thought when it comes to typewriter repair, but it will have its uses. A polishing disk should really make those typebars shine, hoping it isn't a grinding wheel he's using on the keys. The potential for disaster might be greater than the benefits from using such a type of powertool.
The rest (most) of the booklet is an extensive catalog listing of all the types of Handee tool and attachments that are available from the Chicago Wheel and Mfg. Co. of West Monroe Street including project books and a book of plans...
It's got a copyright date of 1940 inside the front cover (and 1938 on the backpage, weird), the first couple of pages extoll the virtues and many uses of this handy Handee tool.
And on the top of page 9, it is found as a useful tool in servicing office equipment; in this case taking a Handee to a typewriter.
Taking a Handee (or a 'Dremel') to a typewriter was not my first thought when it comes to typewriter repair, but it will have its uses. A polishing disk should really make those typebars shine, hoping it isn't a grinding wheel he's using on the keys. The potential for disaster might be greater than the benefits from using such a type of powertool.
The rest (most) of the booklet is an extensive catalog listing of all the types of Handee tool and attachments that are available from the Chicago Wheel and Mfg. Co. of West Monroe Street including project books and a book of plans...
Tuesday, August 12, 2014
Columbia C B 16
Just a record. Lucky find :)
When playing it for the first time it stood out, sounded better than most. Having scouted about on the web a bit to find out more about who the Charleston Chasers were, that may make sense. The Charleston Chasers (these ones active during the late 1920-ies, not the UK orchestra of the same name that is active now) was the name of a studio band for Columbia. The band members list over time reads like a who's who of major American bandleaders of the thirties and forties.
Columbia catalogue number C B 16, from ~1929.
When playing it for the first time it stood out, sounded better than most. Having scouted about on the web a bit to find out more about who the Charleston Chasers were, that may make sense. The Charleston Chasers (these ones active during the late 1920-ies, not the UK orchestra of the same name that is active now) was the name of a studio band for Columbia. The band members list over time reads like a who's who of major American bandleaders of the thirties and forties.
Columbia catalogue number C B 16, from ~1929.
Subscribe to:
Posts (Atom)