Monday, December 28, 2015

Oil renews dried ribbon of typewriter

In those cases where a ribbon dries out rather than wears out. With 'attic-find' machines these days, that is likely the case. The remedy then; a very little light machine oil.

Popular Science, June 1940

Applying WD40 will also do, being 'oil' yet with a very varied mixture of weights. The lighter fractions may help with the moistening throughout. After the spraying technique with WD40, it does however take some time for it all to even out.

Regular machine oil should work fine as well and is less mess. With this method the ribbon doesn't need to be totally unwound from the spools. It can even be done in the machine. The blotting paper trick helps to even things out.

So replicating this sound advice as given in the pages of Popular Science...


Pressing the blotting card gently onto the ribbon (or clip) and winding the ribbon back and forth a couple of times works to even the oil out. There's just that little bit of a shine on the ribbon after the oiling. Probably the oil is still mostly on the outsides of the ribbon and will need some time to fully moisten and release the dried-up ink.


Saturday, December 12, 2015

Confusing Corona

The machine looked derelict which was good, because this was purchased for the case. Had been wanting one to replace the case of the burgundy Speedline Sterling that was eaten by woodworms. (That case was so wormholed, it was almost see-through.) The supply of Corona Speedlines has dried up a bit here. Two years ago there would always be one or two listed online. This was however the first Speedline I'd spotted in a while. That it looked in bad shape was a bonus then - would not feel bad about taking the case and designating it a parts machine for the glossy Speedline.


The case overall is in good shape, but does miss part of a back hinge and has a chipped handle. Looks all replaceable/repairable though. Still very well suited to its task of protecting a Speedline in transport or storage. The dull grey Corona Standard Speedline inside is less derelict than it looked to be.


The machine itself has an interesting keyboard layout. This machine looks like it hasn't got all its marbles in a row and is missing one to boot! Looks like somebody creatively shuffled all the keys around. The letter keys clearly are later replacement keys, a modification to what probably originally was a standard US keyboard layout.


Compared to a 1938 glossy Speedline, it is rather austere and severe in appearance. No stripe on the cover, much of the originally glossy metal parts are simply black. Has a rock-hard platen and no linespacing ratchet, but still works otherwise. The threading of the ribbon suggests some neglect and 'uninformed use'. Again austere, no 'Floating Shift' logo on the strikeplate.


The serial number was again a surprise. It confirms this as a Standard, but the number 3C300146 would put this as manufactured towards the end of 1942. (Thank you Typewriterdatabase!) By that time war production was in effect with the few typewriters then being made new intended for government (military) use only.


That could all actually tie in well with the confusingly charactered keyboard. This is not a joke (probably), but it is a Belgian keyboard layout. Not found any primary sources for this, but this is referred to as the 'Valley' layout. Created in 1890 for speed (yes), this would have been an archaic and rare layout by the late forties I suspect.

Being made in 1942, this likely was used by American forces. Probably then made its way to Belgium in '44 or '45.  Then it somehow stayed behind in Belgium and got a Belgian keyboard layout. From the dealer label on the ribbon cover this was possibly done by Richard Boudin, Office Supplies and Equipment at 70 Rue Du Grand Central, Charleroi.

Perhaps not a parts machine...

First a clean-up and maybe then have a go at repairing this. To replace the ill-fitting replacement keys I think I can manufacture new plastic key inserts. Now to go hunt for a Corona key ring.  :-)

Monday, December 7, 2015

Aristo Nr. 99

A more modern sliderule made in 'Astrolon' plastic (polyvinylchloride). According to the numbers 471 on the back it was made in 1947 in batch 1 by Aristo (Dennert & Pape). A regular 10 inch 'system Rietz' sliderule.


Unlike later extruded models, this is milled from sheet material. Very straight and solid stock.


Glass window cursor with (circle area) C factor and kW to horsepower factors.


Have had this one since probably the mid eighties - have some memory of buying for 50 cents at a jumble sale. They'd only just been made properly obsolete then, so would have been ending up at the back of drawers. Or at jumble-sales :)

Pretty much a common, standard 'Rietz' sliderule that is surprisingly heavy and solid - feels 'precise'.

Friday, December 4, 2015

Dennert & Pape Mannheim

In a dark brown leather sleeve, a Mannheim sliderule made in 1908 by Dennert & Pape of Altona.


Made of mahogany with celluloid scales. A very complete Mannheim with A[B C]D scales and S, T and a mantissa L on the back of the slide. Some yellowing of course, but overall in decent condition. It has a metal plate at the back over its length to keep the two halves of the stock under tension.


The German patent number 126499 of 1901 for this construction is engraved on the inside well of the stock that also has a ruler extension. Engraved in the well are the small digits that indicate the year of manufacture - 08. This particular rule was made with both a cm and inch ruler and the extender in the well in inches. Likely made for export to England.


The D&P logo is stamped on the cursor; glass window, single line. One detail is still a bit of a mystery; the AB scales have an extra marking with a dot at around 1143. This could have been added later, but it looks very clean as if factory made. Not yet caught on to what that number is...

Over a century old; that would make it a proper antique! - nevertheless still works fine.

Anybody with any hints that would shed light on the marking for 1143 or thereabouts, please do share :)

Sunday, November 29, 2015

Polyphase N4053-3

A mahogany and celluloid Keuffel & Esser slide rule. A 'Polyphase', type N4053-3. Similar to the Rietz system, but with small differences on arrangement and how the S and T scales are done. The S is linked to the A scale rather than D scale and the mantissa scale L is at the back of the slide instead of the front.


Complete with its 4053-3S leather protective case and including the instructions on adjusting. This adjustment mechanism with screws is what the patent number on the stock is about. The metal strip protecting the edges of the strap has US patent number 2,000,337 stamped on the edge. Now without that hint, would never have spotted the ingenious locking strips for the tongue underneath.


These K&E are probably very common across the pond, but relatively rare here. Curious for this one and it looked clean in the pictures, so went for it. It indeed is clean, however the plastic slideblocks of the cursor are cracked and the spring very rusty. This seems to be a standard fault with these, the celluloid disintegrates with time. The lower slideblock was also warped a bit, skewing the cursor a little. The cursor screws are corroded and won't budge, but some shimming with strips of thin adhesive paper label inside the slideblock brought it back perpendicular to the scales.

The top cursor slideblock also notes it is patented. Reading the claims, patent protection for rounded corners also happened back in the thirties.


Another unexpected item was that the sine scale is half a millimeter or so off. The celluloid window for the S&T scale on the slider is a bit loose or perhaps warped. Other than all that; it is still straight and serviceable! 

It's rather short and light, compared to e.g. some German slide rules. The cursor even partially slides off the ends at the index positions. Single line cursor also and no C markings. Clean and compact.

From online resources, the serial number puts this slide rule as produced in 1943. (The amount of resources online on sliderules is astonishing, by the way. On the internet, there really is no subject so 'niche' that it doesn't have its collectors society.)


How does a '43 slide rule end up in Holland? Come to that, hadn't realized that slide rules continued to be produced throughout the war - essential tools. (Not consuming too much important raw materials either, may have counted as well.)

Did this little engineering tool come over with allied forces? Or was it perhaps part of Marshall plan items sent over? Or was it just simply exported and sold here after the war from stock. (The here more common makes were not producing much right then, I suspect...)

Analog technology and again a snippet of history :)

Friday, November 20, 2015

Remington Portable with feet for clamping the angled backplate

When a Remington Portable typewriter from the twenties has the extra angled backplate and when not is a bit vague. A mid '27 machine has it, a late '27 does not. The '28 'lava' machine does not and a '29 machine does have it again.


How the plate is supposed to be mounted onto the outer frame also wasn't completely clear from seeing old machines. The backplate has two embossed lugs that align it to the back of the outer frame. The '27 machine had two thick washers between the frame and backplate. Looking at some pictures online, there is mostly a space between the plate and the frame. Ergo it seems likely that the plate was originally mounted with the extra washers. Unclear why that is - it does make the aligning lugs useless as they no longer reach the frame. (See sketch, without washer left, with washer on right.)


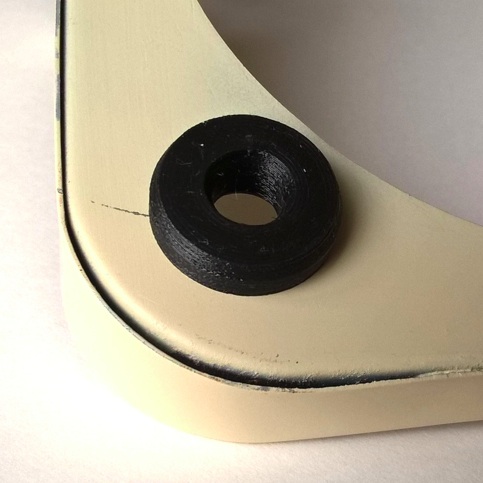
What however was clear is that the feet design I made earlier wouldn't fit with the backplate. The quick fix was to stretch the top flanged diameter a mm to also take the backplate. (This won't take the extra thick washers that were on the machine.) The front feet base diameter section then also stretched a mm to keep it all 'on an even keel'.


The feet were then printed on an FDM machine in polyurethane rubber (Ninjaflex). Printed again by Martin's Hub via 3DHubs. He's got the machine settings for this material pretty much perfected by now and it prints very clean and to correct size. The printed feet snap right in the outer frame.


To create feet that will also take the washers to create some space between the backplate and bottom of the frame would take just some extra stretching of the CAD model. It does make the whole machine sit a bit higher. Judging the height of the machine from the rubber pads on the case base, it can't have been that much higher than this. That would make the original rear-feet design have a very thin base, almost have it sit on the case base. Oh well...  :-)


The 3D model (Sketchup) for the adapted feet and the STL files are on Thingiverse here. If you've got one of these typewriters with dodgy or non-existant feet, highly recommend getting some new feet. For a machine without backplate, of course just manufacture a set of four 'front feet'.

(Another small mystery that remains is why the '29 backplate has a small hole at the rear-left of the machine. Surely the Remington Portable #2 doesn't have a shift-release prod?)

Friday, November 13, 2015

Remington Portable in tangerine and cream

Comes out a very bright and sunny looking machine!


New feet were manufactured to order for the machine. That sounds very excessive, but is not too bad really. More expensive than 20 cents for a simple grommet, but at just over a Euro for a custom made foot it is an entirely affordable extravagance. This machine has the extra angled plate at the back, so a slightly changed 3D model was made for front and back feet to allow for the thickness of this plate. These were then ordered to be 3D printed like the previous set in PU rubber.


The machine is now assembled and works, but still needs a lot of adjusting and tweaking to make it work smooth. These Remington Portable typewriters are capable of being very light and easy to type on, just takes some work to get them there.

It has the platen from the parts machine that is still 'soft' and rubber-like. The wooden core needed to be shortened a fraction of a millimeter. Probably from moisture damage it had swollen uneven and was fouling the brackets. This pressed the linefeed ratchet against the bracket and return-lever, making the line-spacing unreliable. The end-flanges of the platen screw off and the platen core can then be sanded down carefully (at right angles) and put back together again.

The newly made decals didn't come out quite as hoped. Discovered that the bonding agent I used corrodes the copper in the gold ink. A next time we'll know about that...


The case lid from the parts machine cleaned up well. Strong detergent in warm water removes most of the accumulated dirt. On some areas cleaned with a brush to loosen and then a rag to take up the dirt. A general brushing up with wax and polish revived the leathercloth. Most of the rust on the fittings came off with the Moto-Tool and steel-brush. The leather handle taken from the old case to complete it; now again a presentable and functional carrying case.


Showing off the two-tone orange and cream color scheme... (yes!, in an unusual angle)


(To go with this late twenties' deluxe typewriter :-)