Friday, January 21, 2022

Adjusting for wear of the escapement of an Erika folding typewriter

Continuing the fixing-up and full cleaning of the Klapp-Erika; with the carriage-mishaps resolved, on to the escapement. Unlike the Standard Folding typewriter, the Erika has a full 'office-machine' escapement complete with star-wheel and intermediate pinion meshing with a rack on the carriage. The Standard (and Corona) solution is much more compact with the dogs working directly on a ratchet-rack on the carriage. This 'full-size' Erika escapement is even a sub-assembly that can easily be removed from the machine by undoing four screws.

In this cast-iron frame the star-wheel is mounted on an axle that is clamped between two adjustable bearings - for free running without play. The star-wheel itself also has a gear-face that meshes with an intermediate pinion held on a pivot-bolt in the escapement frame. 

The pinion's pivot-bolt on this machine needed to be fixed with the lock-nut in just the right rotation-angle to give the gears a friction-free meshing. Some tweaking was needed to make it all fun freely. All parts were first cleaned (white spirit) and bearing surfaces given a polish as well.


After more cleaning and polishing-up the pivot of the sub-frame that 'escapes' or steps the mechanism, the escapement was re-assembled with small amounts of oil and grease on the pivots and gears. Top-right in below picture there can be seen the tab that the typewriter-base gives a push to trip the escapement. The pivot for the sub-frame with the dogs is at the very left. The spring at the bottom-left provides the return of the sub-frame after escaping one position.

After re-fitting the escapement in the typewriter, the little Erika was noticed to 'skip' and 'slip'. When very slowly pressing down the spacebar through its travel, the carriage would suddenly 'slip' and speed away rattling all the way to the left (as if seeking a tabulator-stop). Also, very occasionally the carriage would advance not 1, but 2 or more positions. These are escapement issues...

The problem very probably was already there before the cleaning, just not noticed - at any rate that'd make me feel better about it. When typing normally or pressing the spacebar with a 'normal' stroke, the carriage still functioned fine.

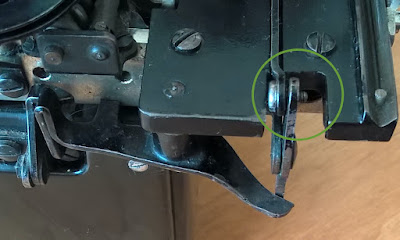
The slipping through the escapement suggested it was not a tripping-point issue, but rather the adjustment of the two dogs as they catch the star-wheel. The likely cause was that the edge of the fixed dog that catches the teeth of the star-wheel wore away just enough to give the star-wheel teeth room to slip between the loose and the fixed dog.

In the Erika's escapement mechanism, the loose dog is pulled by a little spring against the fixed dog - an anvil-surface at its side (green circle) resting against the fixed dog. I.e. there's no way to adjust the assembly to make the gap narrower to compensate for the rounding and wear of the fixed dog. The only way to reduce the gap was to reduce the anvil surface of the loose dog a few tenths of a mm. 

With a grinding-stone in the 'Moto-Tool' and the loose dog held in a vise, the anvil-surface was ground down. Taking off a small amount at a time and then re-fitting and checking for the slippage, a minimal amount of material was removed. Just enough to stop the star-wheel teeth fitting between the dogs.

With some extra shimming under the sub-assembly to improve the meshing of the intermediate pinion with the carriage rack, the carriage escapement is now again mounted and working reliably.

The Erika folding typewriter is actually a nice mechanism to explore and tinker with - nearly everything is visible and easy to get at (notable exception being that pin hiding in te slot of the platen-flange). Most mechanical bits are bolted onto the outside of the typewriter - a machine :)


Wednesday, January 12, 2022

My most worn wristwatch of 2021

Inspired by Teeritz' re-cap of the year in wristwatches that are always read with interest and nudged by Frank's follow-up, here's my most-worn wristwatch of 2021.

Working from home nearly all the time, didn't wear a watch most days - the one that did get use was my 1935 Elgin with its expansion band. There is some yellowing of the crystal (as is common) that gives a golden hue to the dial. Fortunately there is no corrosion (from the yellowing crystal) and the dial is still perfectly readable and the mechanism runs fine.

The Flex-Let scissor-type expansion band is a bit later than the watch, but these start becoming fashionable by the mid 1930s so not too inappropriate for this watch. It takes some getting used to, but then works very well. Being expanding, it's very comfortable around the wrist.

The Elgin's gold-filled (i.e. thinly plated) case with stepped-sides is very art-deco - overall a nice, usable timepiece when worn with care.

Also in the frame is an equally art-deco period Remington 5 Portable typewriter with the 'Streamline' housing style.

The black-and-chrome Kodak Six-20 from the mid to late 1930s is lying on Junkers documentation for their vibration-free engine. Not quite Bond-level material, but perhaps 'ten days in Paris' or 'night train to Munich' atmosphere :)

The pencils are late 1930s or 40s items from Faber, the ruler is of the same vintage.

The model car is a (reproduction) Dinky Toy number 39a, the Packard Super 8 from the American cars series released in 1939. The background to it all is a late 1920s Carte Taride linen-backed map of the Garonne region of France.

Hadn't considered it before, it's a nice idea; January as Wristwatch Retrospective Month :-)

Friday, January 7, 2022

How not to start fixing up an Erika folding typewriter

After starting to improve and fix-up a nice little Erika folding typewriter, things quickly devolved into this:


The reason for getting to the bare carriage-frame was that one of these little ~3.8mm diameter balls dropped out. That's a ball from the carriage bearing - it has six of these. Once started to take off the carriage, might as well clean and re-assemble the whole thing.


The reason for the little ball-bearing to drop out, was my application of excessive and injudicious force to get the platen rod out - in the process also destroying the pin in the rod that is used to mesh with the platen.


The reason the pin was sheared off, was that the platen-knob was rusted solid onto the rod and needed 'violence' to come off. This made it impossible to feel for the right alignment that would have allowed the pin to pass through a slot of the left carriage-side. (Had I been aware of its existence...)


Additional to being rusted onto the rod, the two set-screws that hold the knob had so rusted as to have effectively fused with the knob. Oil, creeping oil, heat and hammer-tap would not make them move - and being set-screws half of the heads of course broke off. So both screws were drilled out. Unfortunately flat recesses were ground on the rod, so fully drilling out the screws still left some chips in the cavity to block the knob (in addition to it being rusted onto the rod). Hence the resorting to force - which should have been applied more carefully and targeted. Hindsight.


The reason to start this 'improvement' process was that, although the machine typed, it tore any ribbon to shreds with a rock-hard platen. This truly slate-like platen also made it very loud and probably risked damaging the type-slugs. So when wanting to re-cover the platen, it all starts with taking out the cylinder and that needed the platen knob removed with the rusted set-screws. It all kind of developed from there...

On the plus side, the whole carriage assembly is again squeaky clean and polished with new oil and grease where needed. Also the construction is now understood - how it is all supposed to work. Especially that little pin that fits a slot in the line-spacing ratchet is something that'd take a bit of fiddling to find out.

With the now-clean carriage assembled and the paper-bail ruler re-painted with new cream lettering, the parts that I broke were seen to. The ~2mm set-screw holes were drilled out a bit more and new thread was tapped. Mainly because I had 6BA taps and screws handy, this will probably be the only German typewriter with British Association threaded parts on it. A couple of degrees next tot he location of the sheared-off pin, a hole was drilled and a 1.6mm nail-end driven in. This nail-end was then filed to shape, to be a close fit with the slot in the ratchet.


New brass screws were given a nickel finish to fit in. Brass is not really strong enough, but at least they're not going to rust as badly as the original parts!


The small set-screws will probably be replaced by slightly-stronger short screws with a proper head. The margin-release bar however makes it tricky, leaving little room for a screw-head. Best to start with a too-long screw to make shorter than the other way around...


One slightly worrying thing is, that I've one nut left over (diam. ~ 2.3mm in thread). When taking the carriage apart, all sub-assemblies were carefully kept in lots of small plastic bags with their screws and nuts. However, when taking out the margin-bar a small nut seemed to drop unexpectedly, probably somewhere from the left-side of the carriage. I have no idea where that came from or where it should go. The typewriter seems to function fine without this nut, but it is still slightly worrying.


There actually is one spot where a nut is missing - on the backspace levers assembly. The superfluous nut is however too large for this screw-thread (diam. ~ 1.8mm over thread). To further add to the 'discomfort' on all this; when a correct little nut is added to properly tighten this assembly, then the carriage fouls the backspace-mechanism and blocks. So for now it's left as a pivot-bolt without a nut. And a little extra nut in a tray.


Oh, almost as an afterthought - the platen was re-covered with one layer of rubber (inner-tube) and three layers of heat-shrink. The ends were taken off and kept in little bags like all the parts and sub-assemblies. Both marked for rotation so they could be fitted back with the same rotation. Also the feed-roller that was very much not-round got re-covered with heat-shrink layers building up to the right diameter.

Net result of the whole effort was that we had a lot of entertainment out of the machine and -fortunately- are again at a point where the Erika types!  :-)

Sunday, January 2, 2022

From Mr Kennedy's workshop came a small cactus watering can

The maker's mark underneath a small watering-can, a 'cactus watering can', states that it's from Kennedy in Loosdrecht.

Amazingly, on the digitized archives of a local newspaper a photograph could be found of Mr Kennedy's copper-smithy, made in January 1954. The caption stated it is the coppersmith's shop of Mr. Kennedy housed in an old school in Nieuw-Loosdrecht.

Not sure who Mr Kennedy is or if he is even in the picture - the photographer will have stood on a workbench in one corner and instructed the boys to pose with their work. Some of the brightly polished products of the workshop strategically scattered around a workbench - and there on the workbench in front is standing the exact same watering can.

Of course unlikely to be this exact specimen, but it is one of the exact same pattern. And as this was not mass-manufacture, this particular 'cactusgietertje' with the flattened shape sitting on the table here today was very likely made around 1954 too.

These copper body with brass handle+spout watering cans came into fashion from, I think, the 1930s and were most common during the fifties and sixties in The Netherlands. Generally called 'cactus watering cans' (cactusgietertje) they also are found in e.g. Germany, but seem to be less common in most other countries. 

It's nice to be able to 'place' an object and very neat indeed seeing it when new in the place where it was made with the people that made it :)